Sewer Hose Extended Storage

 [ HOME ]

Model Information

Miscellaneous
Accessories
Floor Plans & Specs
How To Buy Or Sell A Rialta
Known Problem Areas
Modifications, VW & Coach
New to RVing? Info here
Pros & Cons of a Rialta
Vehicle Checklist
VIN Information
Winter RV Storage

VW Service

Air Conditioner
Brakes
Door & Locks
Engine Battery
Engine Repair Information
Filters
Fuses: Dash & Engine
Mechanics & Dealers List
NHTSA Recall Notices
Oil Change
Parts Diagrams
Radiator & Coolant
Serpentine Belt
Service & Tech Bulletins
Spark Plugs & Ignition Wires
Transmission Service

Winnebago Service

Appliance Recalls
Bulbs
Caulking and Sealants
Coach Batteries
Electrical Breakers & Fuses
Furnace & Thermostat
Generator
Microwave, Range & Oven
NHTSA Recall Notices
Paint Codes
Parts Catalog
Plumbing Diagrams
Refrigerator
Service Bulletins
Shocks and Air Springs
Shower
Supplier Links
Tires & Wheels
Toilet
Water Heater
Water Pumps & Filters
Winnebago Corporate Info
Wiring Diagrams

Tours & Pictures

Public RV Sanitary Dumps
Strange & Unusual Places
Winnebago Factory Tour

   ► Related Links


The built-in storage tube on the Rialta allows for nothing more than about a 6-10 foot long sewer hose and that's only if you can fully compact all of the coils to squeeze the entire thing into the tube.

Several modifications have been proposed starting first with just an additional storage tube and ending with the mod to the existing storage tube that will allow up to 27' of sewer hose to be stored!

I have found that at some campgrounds, the location of the sewer connection is not compatible with the 10-foot sewer hose that comes with the Rialta.  
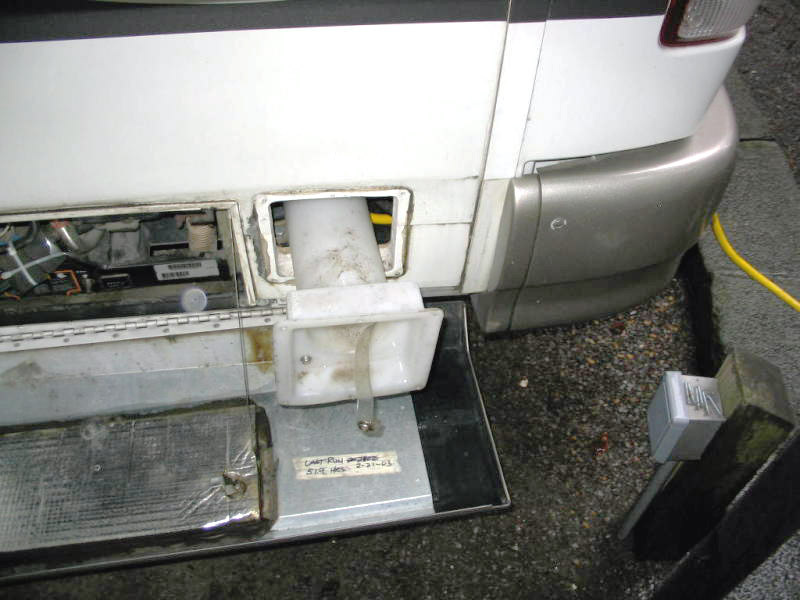
A 20 foot hose will not fit into the built in storage tube.  To get around this problem, I made up a 26" long tube of 4" DWV (drain-waste-vent) pipe with a cap in place on one end and a connector on the other that accepts a screw in plug.  It easily holds a 20' sewer hose.  I mounted it longitudinally under the right rear corner of the coach along side of the trailer hitch angle.  I used stainless steel worm-drive clamps to hold it in place.  I have posted two pictures in the photos section of this list.

I originally made up a 5' long tube last year and mounted it transversely below the trailer hitch.  It was a bit of overkill for the length of hose but I needed it that long in order to get mounting points at each end of the trailer hitch.  Well, this was a bad idea as it hung down too low and would bottom out on such places as steep driveway entrance ramps to gas stations or at similar type spots.  I re-worked the tube this spring and came up with the current design, which works fine.

Richard Cox
2002HD


Richard,
I too made a modification to accommodate a longer hose.  I removed the existing hose storage tube and cut off approx 8" I then added a 45 degree elbow made of light weight drain pipe and routed the pipe upwards on a slight angle.  I then added a 90 degree elbow and a straight section with a cap on the end and then routed this entire assembly across and under the left side dinette seat just above the fuse panel.  I can now store a 27' drain hose under the seat and access it from the original location.

Phew!!!  I hope I explained this clearly.

Harry P.
98 RD


NOTE - Harry's solution posted above (and pictures below) was very ingenious but there was one pitfall.  If you weren't careful or didn't know the difference you could end up with a 90 degree short sweep elbow whereas Harry's pictures showed a 90 degree "long sweep elbow".  For example:

From: "Holly H. Towne" <towne@...>
To: <Rialta-Tech@yahoogroups.com>
Sent: Wednesday, March 03, 2004 7:35 PM
Subject: [Rialta-Tech] Harry Pinchot's Sewer Hose Modification

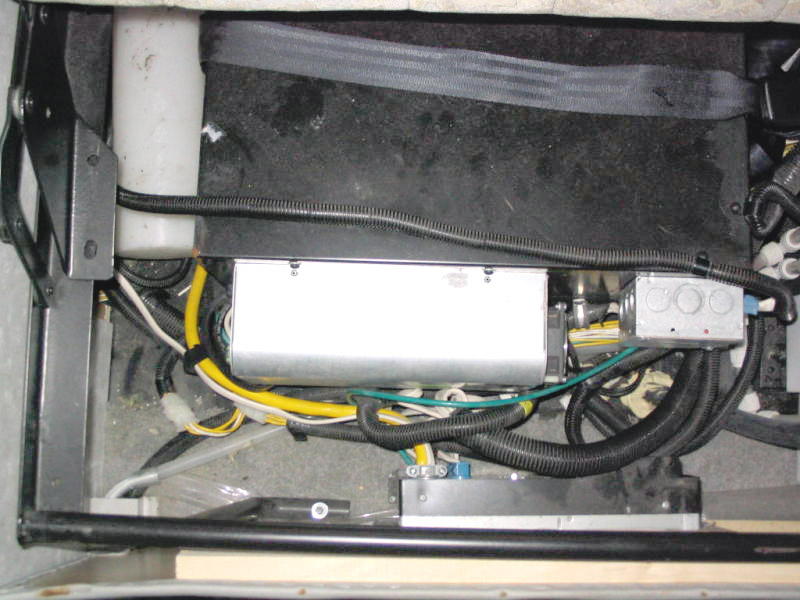
Back in June of 2003, Harry Pinchot posted a message (#8268) about his sewer hose modification that increased the length of hose that can be stored by cutting and then lengthening the tube through the generator compartment and then routing it up and forward under the back dinette seat.

I had just gotten through my first adventure with dumping the black and gray and all other colors of interesting stuff on my legs and feet because of a too-short hose, so the idea had my attention.

I went out and bought all the right stuff, printed out the pictures and instructions, got additional input and guidance, and fearfully started in to make it work....last August.  I couldn't make it work.  I believe I have cut my full length piece of white 4" PVC more than anyone else trying to get it right... and I won't be sharing the leftover piece to help someone else... there isn't any.

Now before Baldy tells me I'm too stupid to own a Rialta and I should sell... quick before I do any more damage to it... *grin* I would like to report that today I finished the job.  There was a reason it wouldn't work for me, and I figure it's important enough to mention.

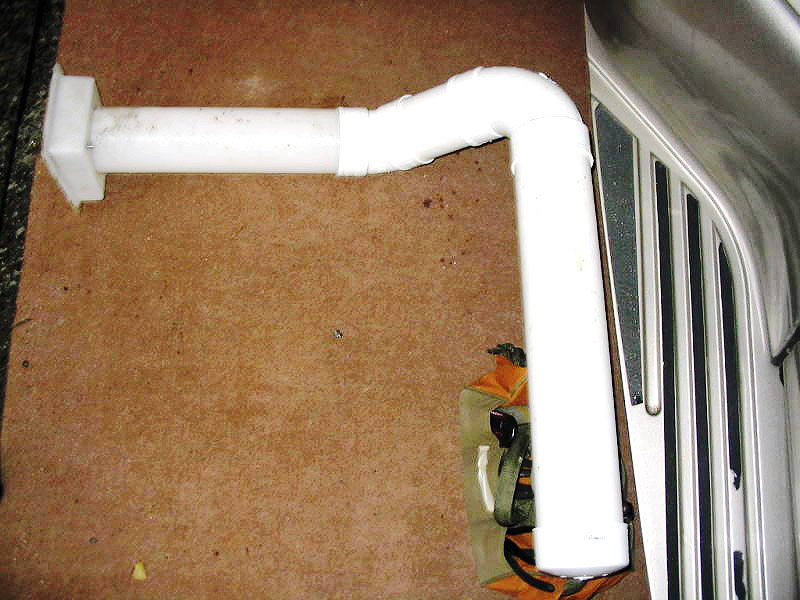
I went to Home Depot to get my 'parts' and after keen observation, I realized that Harry's 90 degree connector looked a lot different from my 90 degree elbow.  His shows a long, graceful sweep. Mine made the turn in half the space.  Looking more closely, I noted that my end cap was flat on top, while his looks curved.  Sure enough, I think that Harry's solution came through Lowes and their pipe brand is different... and that made a HUGE difference, buying the 45 and 90 degree elbows at Lowes yesterday made it possible to make the turn at the top rear of the bench that I had been unable to accomplish before.

So the moral of the story, if you want to make the mod that will let you store 27' of sewer hose instead of the original, get your parts at Lowes to make it a lot easier on yourself.

hht
99QD with an awesome sewer hose!


Holly,
What you did was describe the difference between a regular 90 degree "el" and a "long sweep el."  The former is used on the venting side of sewer systems because sewer gas doesn't really mind the sharp turn, while the long sweep el is used on the fluid side because fluids DO mind.  I think HD does have the long sweep els too, if you know exactly what you want and where it might be.  But you're right, Lowes usually has a broader selection of plumbing fittings.

Bernie
Bernard D. Ritchie, DVM
Ephrata, PA


Picture 1 shows the area between the lower kick panel of the rear bench seat (on a model HD or QD) and the area occupied by the electrical converter box and wheel-well which is where the finished product will lie.  The original storage tube can be seen protruding into the compartment in the upper left corner of the photo.
Picture 2 shows the original tube being removed and which will have the closed end cut off.
Picture 3 shows the entire finished assembly all by itself.  Note the addition of the ABS plastic fittings such as the 45-degree elbow, the 90-degreee long sweep elbow, and the extended pipe sections.  Note that the joint between the 45-degree elbow and the original tube can NOT be glued together.  The original tube must be re-inserted from the outside and the remaining assembly to connected to the original tube from the inside. I supposed one could glue the joint at this time but it might be very wise to leave it as a dry, slip-fit to allow for future disassembly.
Picture 4 shows the finished assembly in place.  Note how the extension after the 90 degree elbow sits up over the Magnatek converter box (breaker box).


Additional Modifications:

[ Arm Rest Removal ] [ Automatic Transfer Switch ] [ Awning ] [ Bathroom Shelf & Basin ] [ Battery Disconnect ]
[ Belly-Pan Cutout ] [ Bicycle Rack ] [ Cabinet Storage ] [ CB Radios ] [ Center Console ]
[ Closet Shelf ] [ Coach Door Seals ] [ Coach Entry Floor ] [ Computer Table ] [ Convex Door Mirror ]
[ Curtain Track ] [ Door Catch ] [ Daylight Running Lights ] [ DVD Conversion ] [ Entertainment Center ]
[ Entry Handrail ] [ Exterior Power Inlet ] [ Exterior Shower Drain ] [ Fuel Pump Jumpers ] [ Furnace Vent ]
[ Galley Faucet ] [ Generator Fuel Cutoff ] [ Granite Countertop ] [ Headboard ] [ Jack Handle Storage ]
[ LCD TV Conversion ] [ LED Bulbs ] [ Magnum Shooters ] [ Map Box ] [ Microwave Convection Oven ]
[ Propane Detector ] [ QD-H Conversion ] [ Rear Axle Stiffener ] [ Rear Couch Foam Roll ] [ Heat Control Label ]
[ Rear Seat Kick Panels ] [ Refrigerator DC Mode ] [ Refrigerator Conversion ] [ Roof Air 13,500 ] [ Roof Rack ]
[ Satellite Dish ] [ Sewer Dump Valve ] [ Sewer Hose Storage ] [ Shade Standoffs ] [ Shower Faucets ]
[ Shower Filter ] [ Simple Shoreline Conversion ] [ Skylight Panel ] [ Spare Tire Carrier ] [ Super Freezer ]
[ Throttle Body Cleaning ] [ Transmission Dip Stick ] [ Trunk Handle ] [ Wheel Covers ]  

[ HOME ]
No images, artwork, or photographs may be used without  permission.
Page Updated: 19 February 2015