|
[ HOME ]
|
|
Model Information
|
|
|
|
VW Service
|
|
|
|
Winnebago Service
|
|
|
|
Tours & Pictures
|
|
|
|
►
Related
Links
|
| |
On this page:
Replacement VW Keys:
Several Rialta owners have requested assistance in obtaining duplicate keys
for the VW ignition and front doors. Several others have commented that the keys
incorporate a "computer chip" and merely making a duplicate at a locksmith will
not start the engine. This brought up a great discussion as to whether a standard
locksmith-made duplicate key would work in the ignition system or not. All chassis made starting
1 December 2000 have the electronic system known as the Immobilizer, another computer.
It is also apparent that Winnebago did a running changeover
from the spring-wire transfer to the magnum shooter contacts on the side door
jamb, between April and May of 2001.
What this all means is this:
2001 Rialta and older (uses a EuroVan chassis that is 2000 or older) then
you CAN use a standard replacement key to operate the ignition.
2002 Rialta and newer then you can NOT
use a standard replacement key to operate the ignition. It will start, but die in about half a second.
If you have one of the newer chip-encoded keys, then a regular locksmith can
not make a duplicate key which will work in the ignition system. The folding keys with the remote buttons
have been declared obsolete by VW. You may still be able to get a valet key.
In spite of what year you may have, I personally recommend that everyone get
a standard locksmith-made duplicate key, a magnetic spare key hide-away box and
attach it somewhere securely in a concealed spot under the vehicle where it won't
get washed or shaken off. This hidden spare key will still work to unlock the
doors.
[ return to top ]
Front VW Cab Doors: Key Cylinders
To remove the outside door handle, you need to only remove two large black
Phillips screws at the edge of the door. Neither the interior door panel or anything
else needs to be removed to access this outside handle. By doing so, you can replace
the key cylinder to the door if necessary. Be careful handling the assembly once
it is outside of the door. The complete assembly is all cast and can easily be
broken if dropped or mishandled. A complete replacement handle costs about $120.00
and needs to be special ordered by VW. They are available from Europarts-SD for about $70.
If you'd like to be able to use the same key on all doors, you can swap the lock cylinder from the old one
using the information in this file.
You may also be able to repair your original handle using this file.
If you need to go further and remove or replace the actual lock mechanism,
then follow these steps:
-
To remove the actual lock mechanism in the door, first make sure the window
glass is in the full up position.
-
Remove the interior panel (see "Front
VW Cab Door: Adjusting the handle to unlatch properly" for instructions)
-
Remove the outside handle.
-
 Remove
the two screws that hold the electric lock actuator to the metal door frame.
Disconnect the wire plug. Remove
the two screws that hold the electric lock actuator to the metal door frame.
Disconnect the wire plug.
-
Remove the three large black Phillips screws along the edge of the door.
The lock mechanism will now be free inside of the door.
-
Carefully pry the interior actuator rod out of the one black plastic guide.
In just snaps in place and hopefully you won't break it by unsnapping the rod
from the guide piece. I doubt if any dealership carries a replacement part.
-
Reach into the door and pull the window glass run channel material out of
its pocket all the way up to the bottom of the glass. Do not try to remove the
channel but merely pull all of the channel that is below the glass out of the
way and hold it more or less parallel with the bottom edge of the glass.
-
Reach in and grab the lock mechanism and it will slightly rotate out of
its position behind the window glass metal run channel. By temporarily removing
the run channel material from this area, this allows enough room for the lock
to pivot out and be pulled free.
[ return to top ]
Front VW Cab Door: Adjust the handles to unlatch properly
One problem that seems to plague several EuroVans concerns the problem with
the handles not quite un-latching the door in order to open it. Usually this shows
up as one having to pull on the interior or exterior handles to the absolute fullest
or maximum amount in order to barely unlatch the door. One would expect that a
simple lock or handle adjustment is all that would be required to fix the problem
but VW was not so kind to us in this area. Gaining access to the inside of the
EuroVan door requires a little bit of knowledge ahead of time but anybody can
do it with nothing more than a Phillips screwdriver.
The only thing to know is that the entire plastic door panel comes off in one
piece and when it is ready to come off, it comes off by lifting the panel upward.
Most other cars have a panel that is held in place by plastic snap fasteners and
to remove the panel, one simply pries outward. If you try that on the EuroVan,
you'll break off the large plastic L-shaped hooks that are part of the panel itself.
They will most likely leave a large visible hole in the panel and you'll end up
replacing everything.
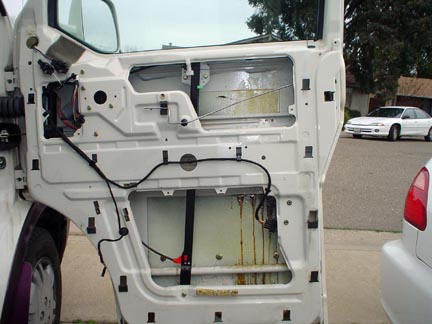
Removing the interior panel:
-
|
Remove one small Phillips head screw
at the top of the panel where it wraps around the edge of the door towards
the windshield.
|
-
|
Remove the electric door lock tip
that sticks out the top of the door panel by unscrewing it from the threaded
rod.
|
-
|
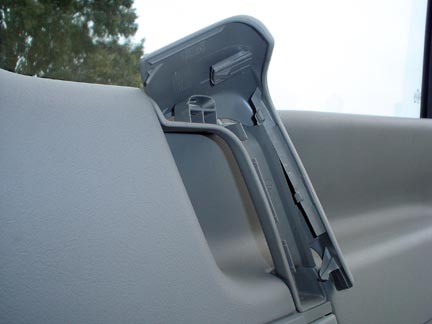
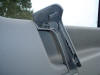
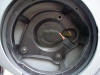
Carefully pry apart the large pull
handle. It will come apart in two halves revealing three screws inside. Remove
all three screws. Examine the photo to show how and where the handle actually
snaps together. Click on either image to view full size:
 |
-
|
Near the top of the door panel along
the lock side is a plastic rivet. Carefully pry up the center portion about
1/2" and then the entire rivet will pull out. If you damage it or break it,
a replacement piece can be purchased at the dealership and they are very cheap.
Don't ask me why they use a screw on the front side of the panel and a plastic
rivet here. Doesn't make sense to me but we are dealing with Volkswagen here.
|
-
|
Carefully pry off the speaker cover, start toward
the bottom edge so that any marks you may accidentally make will not be visible.
Once you get one of the snaps to release, the others will come off very easily. |
|
| |
|
|
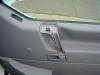
-
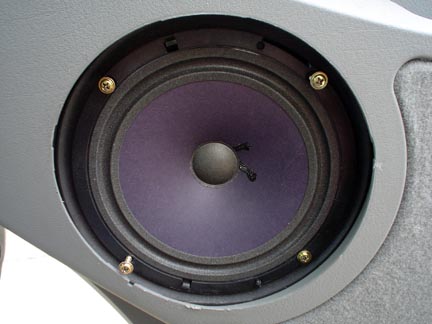
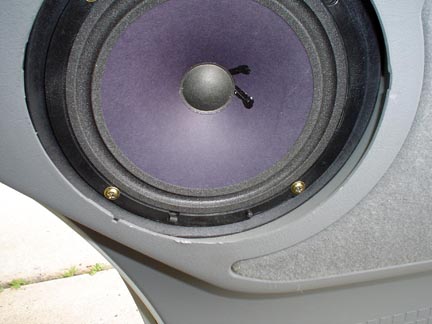
|
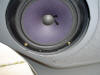
After the speaker cover is removed, remove the
four screws that hold the speaker in place. Remove the speaker and disconnect
the wire plug. |
 |
| |
|
|
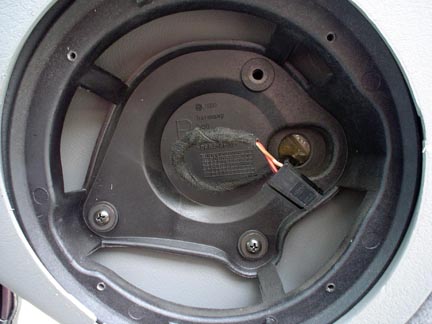
-
|
After the speaker is removed, remove the four
screws that hold the speaker support to the door panel. |
 |
| |
|
|
-
|
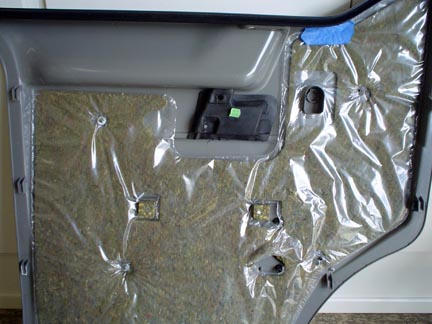
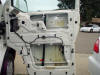
Grab the entire plastic panel and lift straight
up about an inch or two. Once the panel is free of the door, disconnect the
electric window plug. Reach down and pull the speaker wire through the panel.
Now that you have the panel completely free, take a good look at those L-shaped
hooks and how they attach to the slots in the metal door frame. |
 |
Making the needed handle adjustment:
 With
the interior door panel removed you'll quickly notice that the actuator rod that
runs from the handle to the lock mechanism lacks any sort of threaded adjustment
capability. I don't know what VW was thinking in this design but I guess they
assumed that everything would be made to perfection and fit together just like
it does on paper. Practically all other vehicles allow for some sort of adjustment
mechanism here but the EuroVan totally lacks that capability. The only thing to
do is to "bend" or otherwise take up some slack in the actuator rod so that the
handle does not have to move it so far. With
the interior door panel removed you'll quickly notice that the actuator rod that
runs from the handle to the lock mechanism lacks any sort of threaded adjustment
capability. I don't know what VW was thinking in this design but I guess they
assumed that everything would be made to perfection and fit together just like
it does on paper. Practically all other vehicles allow for some sort of adjustment
mechanism here but the EuroVan totally lacks that capability. The only thing to
do is to "bend" or otherwise take up some slack in the actuator rod so that the
handle does not have to move it so far.
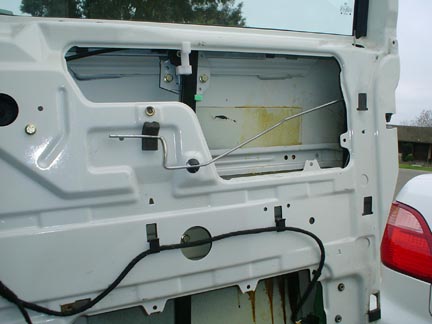
You will note that there are three metal rods attached to the
lock mechanism in the side of the door, each being held in by a white plastic
retainer. I suggest leaving these attached in place. Otherwise, if you break one
of these small white plastic retainers, getting a replacement might be a problem.
One metal rod that sticks up vertically is the lock tab that you
manually pull up or push down when you want to lock or unlock the door.
Another rod hands straight down and is attached to the VW electric
lock solenoid. Actually both of these rods are attached to the same lever on the
lock; the electric solenoid does that same exact thing that your fingers would
do on the lock knob that sticks out the top of the door.
 The
third rod is the long horizontal actuator rod for the inside handle. It merely
comes over through the black plastic guides and then bends upward with a small
curvature right behind the area where the interior door handle engages it. It
is along this small vertical curvature of the rod in which your inside door handle
merely pushes against thereby transferring the movement to the lock mechanism
in order to release the latch. It is this rod in which the "bend" or adjustment
must be accomplished. The
third rod is the long horizontal actuator rod for the inside handle. It merely
comes over through the black plastic guides and then bends upward with a small
curvature right behind the area where the interior door handle engages it. It
is along this small vertical curvature of the rod in which your inside door handle
merely pushes against thereby transferring the movement to the lock mechanism
in order to release the latch. It is this rod in which the "bend" or adjustment
must be accomplished.
The "bending" solution:
The VW mechanic tried bending the actuator rod a little but didn't
really gain anything in my case. I thought about increasing or making some other
bends closer toward the lock mechanism which would have the effect of shortening
the rod but all those little bends in the rod from the factory are there for a
purpose, mostly to miss the window mechanism as it moved up and down. In reality,
the bend need to incorporate about 1/8" of clearance between the curve in the
rod and the lever of the handle that engages it. It is difficult to accomplish
this much without severely distorting the entire actuator rod or worse, breaking
one of the plastic guides through which it passes.
One other possible solution:
Then I thought of a simple solution: what if I could slip some
sort of tube or bushing over the area of the rod where the interior door handle
would push against it. That added diameter of the tube or bushing would take up
some of the slack space and make the latch release a lot sooner and a lot easier.
My final solution consists of a short piece of plastic tubing with an ID about
the same as that of the rod itself. The hard part is to get the added tubing to
slide over one curve before it gets to the position that you need it to be at.
A tubing with an ID somewhat larger than the actual rod itself allows the tubing
to make the curve. Some added soap solution or other lubricant also helps. Once
in position, the added tubing can't go anywhere and it fixes the problem perfectly.
Reinstalling the interior door panel:
|
To re-install the door panel,
you'll note that there are some rubber gaskets that attach to the slots
in the metal door frame. Some may have been left on the metal door frame
while some may have pulled out still attached to the L-shaped hooks on the
door panel. Depending upon the mental state of the VW installer at the factory,
not all of the hooks and slots will have a rubber gasket; probably just
enough to keep the panel from vibrating at road speed. Place all of the
rubber gaskets onto the bottom edge of the slot in the metal door frame.
To re-install the panel, simply hold the panel in place and make the
wiring connections for the power windows and push the speaker wire through
the panel. Then visually align the L-shaped hooks of the plastic panel over
each slot in the metal door panel. Simply push slightly inward and downward
and the panel will fall into place. Replace the speaker support, the speaker,
the speaker grill, the handle screws, the handle half, one screw at the
top, one plastic rivet at the top, and screw the lock tab pack on the threaded
rod.
|
|
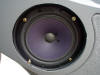
When replacing the speaker, note that it will
only go back in one position with two locator pins to guide you. |
 |
| |
|
|
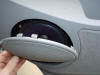
When replacing the speaker grill, note that
there is a small tab and slot that must align along the bottom edge. |
 |
[ return to top ]
|