Curtain Track

 [ HOME ]

Model Information

Miscellaneous
Accessories
Floor Plans & Specs
How To Buy Or Sell A Rialta
Known Problem Areas
Modifications, VW & Coach
New to RVing? Info here
Pros & Cons of a Rialta
Vehicle Checklist
VIN Information
Winter RV Storage

VW Service

Air Conditioner
Brakes
Door & Locks
Engine Battery
Engine Repair Information
Filters
Fuses: Dash & Engine
Mechanics & Dealers List
NHTSA Recall Notices
Oil Change
Parts Diagrams
Radiator & Coolant
Serpentine Belt
Service & Tech Bulletins
Spark Plugs & Ignition Wires
Transmission Service

Winnebago Service

Appliance Recalls
Bulbs
Caulking and Sealants
Coach Batteries
Electrical Breakers & Fuses
Furnace & Thermostat
Generator
Microwave, Range & Oven
NHTSA Recall Notices
Paint Codes
Parts Catalog
Plumbing Diagrams
Refrigerator
Service Bulletins
Shocks and Air Springs
Shower
Supplier Links
Tires & Wheels
Toilet
Water Heater
Water Pumps & Filters
Winnebago Corporate Info
Wiring Diagrams

Tours & Pictures

Public RV Sanitary Dumps
Strange & Unusual Places
Winnebago Factory Tour

   ► Related Links


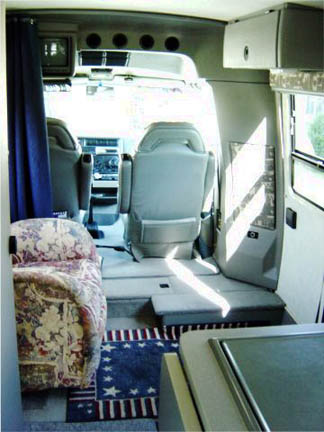
This modification consists of a form fitting top track from which privacy curtains can be opened or closed that separate the cab seats from the coach area.  The choice of curtain fabric material is entirely up to you.

One other item of note is once this curtain which is full length, ceiling to floor, was installed it made some difference in keeping it cool inside on a hot muggy day.  We don't want to overstate this but it's quite amazing the amount of heat which enters the unit from the front passenger area with the sun beating down.  We still have the small A/C.  One of these days we will upgrade to a larger A/C.

This is a 97RD with the four seats.  We removed both back seats and replaced one with a more comfortable rocker, swivel chair.  Occasionally we put the 4th seat back in but most of the time we just have the rocker behind the drivers seat.

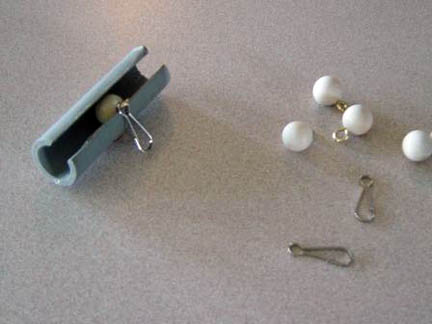
Our solution was a 10' piece of plastic electrical conduit from Home Depot which cost $1.18  We used a router to cut a 1/4" slot.  The balls are  1/2" wood with a small eyelet screwed into a lead hole which we added to the ball with a tiny drill bit. 

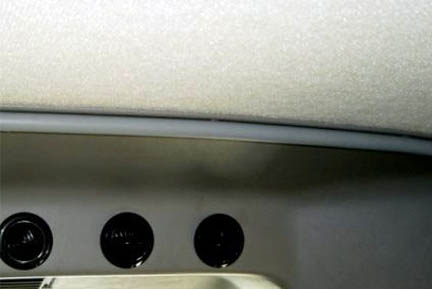
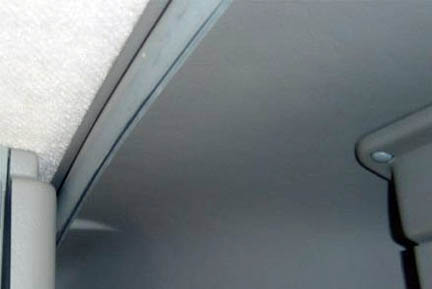
We mounded the track right where the molding which houses the upper rear A/C meets the fabric on the ceiling.  We used the same holes and screws which hold the molding.  They are plenty long enough.  We cut the track to length, started in the middle by holding the track up and drilling a small hole through the track to match the hole in the molding/ceiling.  After the first screw was secured we just worked our way to either end.


Additional Modifications:

[ Arm Rest Removal ] [ Automatic Transfer Switch ] [ Awning ] [ Bathroom Shelf & Basin ] [ Battery Disconnect ]
[ Belly-Pan Cutout ] [ Bicycle Rack ] [ Cabinet Storage ] [ CB Radios ] [ Center Console ]
[ Closet Shelf ] [ Coach Door Seals ] [ Coach Entry Floor ] [ Computer Table ] [ Convex Door Mirror ]
[ Curtain Track ] [ Door Catch ] [ Daylight Running Lights ] [ DVD Conversion ] [ Entertainment Center ]
[ Entry Handrail ] [ Exterior Power Inlet ] [ Exterior Shower Drain ] [ Fuel Pump Jumpers ] [ Furnace Vent ]
[ Galley Faucet ] [ Generator Fuel Cutoff ] [ Granite Countertop ] [ Headboard ] [ Jack Handle Storage ]
[ LCD TV Conversion ] [ LED Bulbs ] [ Magnum Shooters ] [ Map Box ] [ Microwave Convection Oven ]
[ Propane Detector ] [ QD-H Conversion ] [ Rear Axle Stiffener ] [ Rear Couch Foam Roll ] [ Heat Control Label ]
[ Rear Seat Kick Panels ] [ Refrigerator DC Mode ] [ Refrigerator Conversion ] [ Roof Air 13,500 ] [ Roof Rack ]
[ Satellite Dish ] [ Sewer Dump Valve ] [ Sewer Hose Storage ] [ Shade Standoffs ] [ Shower Faucets ]
[ Shower Filter ] [ Simple Shoreline Conversion ] [ Skylight Panel ] [ Spare Tire Carrier ] [ Super Freezer ]
[ Throttle Body Cleaning ] [ Transmission Dip Stick ] [ Trunk Handle ] [ Wheel Covers ]  

[ HOME ]
No images, artwork, or photographs may be used without  permission.
Page Updated: 30 March 2013