|
On this page:
Religiously changing your oil on the Rialta engine is the best
thing you can do for it. It is not much different than changing oil on any other
motor vehicle. As with many newer cars, there is a sheet metal "belly pan" that
should be removed to gain access to the oil filter. This pan is not heavy and can
easily be maneuvered out of the way by one person. Make sure you use a new filter
and o-ring at every oil change.
Oil Change Tools & Equipment:
¤ - Ramps
¤ - Tools:
- Large Crescent-type wrench or suitable gripping tool
to remove the filter cap
- 19mm wrench or socket
- 10mm wrench
- 13mm socket and extension
¤ - 6 quarts oil
¤ - Oil filter
RAMPS:
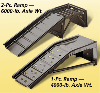 Necessary
for gaining ground clearance to lower or remove the belly-pan. Make sure that
they are rated for at least 4,000 pounds axle weight. Technically, you can crawl
underneath and remove the belly-pan without the use of ramps but this sure makes
things a lot easier. Cost is around $30-40. Available at Wal-Marts and nearly
all automotive supply stores. Necessary
for gaining ground clearance to lower or remove the belly-pan. Make sure that
they are rated for at least 4,000 pounds axle weight. Technically, you can crawl
underneath and remove the belly-pan without the use of ramps but this sure makes
things a lot easier. Cost is around $30-40. Available at Wal-Marts and nearly
all automotive supply stores.
TOOLS
19mm wrench or socket for removing the oil drain plug
10mm wrench for removing nuts on back brackets of the belly-pan
13mm sockets and extension for removing bolts on the belly-pan
Large Crescent-type wrench for removing the oil filter cap. Some people
are using a 36mm socket which fits over the large hex nut at the bottom of
the filter cap. Still others are using is simple band type filter wrench which
grabs and tightens onto the outside perimeter of the cap allowing it to be
loosened or tightened.
OIL:
Six quarts will be required. There is much misinformation
and contradictory information from VW as to exactly what the oil capacity is
supposed to be. As a precaution, check the oil level after you are about 1/2-way
through the 6th quart. Do not overfill.
VW officially recommends a multi-viscosity oil of 5W-40 or
5W-30 but unless you are in a severe cold area, 10W-40 or even 10W-30 will work
just fine. Check with your local VW dealership and ask what oil they put in
when they perform an oil change. Most are using 10W-30. The oil must carry an
API Service designation of "SL" (which nearly all major brands will meet).
Some people prefer to use a synthetic oil which has better
lubricating properties especially under extreme heat and pressure. The downside
is that is somewhat more expensive per quart, but makes up for it in longevity. And contrary what some unscrupulous
dealers may be telling you, Volkswagen Corporation has NOT required the use
of synthetic oil over the traditional "dinosaur" oil. Volkswagen has indicated
that it is a better, more preferred oil but its use is not required to maintain
your warranty status. Only you can decide if you want to spend the extra money.
Step-by-Step Oil Change Procedure:
Before you begin, you should know that the VW EuroVan chassis
from which the Rialta is based uses a sheet metal "belly-pan" underneath the engine
area on all VR-6 based engines. Some dealers and service centers may refer to
this as a "skid plate" but don't be fooled; it is merely sheet metal and very
light. It requires less than 5 minutes of extra work to remove the four bolts
and two nuts that hold it in place. The oil drain plug is accessible without removing
the belly-pan on all model years but in order to access and change the oil filter,
the belly-pan must be removed. This pan helps direct cooling air and keeps un-necessary
water and road debris from splashing all over the engine and other components,
in addition to quiet engine noise. In fact, the official name and description
from VW is "sound deadener".
You can optionally modify the belly-pan by creating a cut-out
in the area of the oil filter which will allow you to change the oil filter without
removing the belly-pan. See the modifications page entitled "Belly-Pan
Cut-Out" which is a Winnebago Service Bulletin in Adobe PDF format for complete
instructions. This modification will not void any VW warranty.
1. RAISE THE RIALTA
Drive your Rialta's front tires up on the ramps, put it in
park, put the emergency brake on, and shut off the engine. Remove the ignition
keys so that somebody doesn't accidentally start up the engine while you are working
on it. Place proper blocks behind the back tires to prevent the vehicle
from rolling back off the ramps. Don't skip the last part of this step --- be
safe and remember that you would probably not survive the weight of a Rialta coming
down on you if it rolls back down the ramps. Just think "what if" and be safe.
This is why I don't use a hydraulic jack to raise up the Rialta. If your ramps
are nearly maxxed out for their load limit, then before you crawl underneath you
may also wish to place some jack stands under the frame so that if one of your
ramps collapsed, then the vehicle would only fall onto the jack stand.
2. DROP THE BELLY-PAN
Even if you don't have to remove the belly-pan, some people
still like to completely remove it so that it gives them complete and easy access
to the oil filter plus a chance to visually inspect other components while looking
for loose hoses, clamps and brackets. Its also a good time to clean up any road
debris or residual oil film on the belly-pan and other parts.
 There
are two 10mm hex nuts towards the rear of the pan where the back end of the belly-pan
changes into two hanger brackets. Remove both of these 10mm nuts. You will also
note that the rear hanger fits into a slot of the undercarriage. When you drop
the belly-pan, you can optionally choose to leave these hangers in the slots which
effectively serve as a pivot to allow the pan to drop down for service access.
Its a minor hassle to wiggle the hangers loose or to re-install them if you do
decide to completely remove the belly pan. I recommend that you completely remove
the belly pan as it will afford you an opportunity to get an unobstructed view
of the engine area and clean up any oil or fluid drips, not to mention the
ability to retrieve that nut, bolt, or wrench that you dropped through the engine
area. There
are two 10mm hex nuts towards the rear of the pan where the back end of the belly-pan
changes into two hanger brackets. Remove both of these 10mm nuts. You will also
note that the rear hanger fits into a slot of the undercarriage. When you drop
the belly-pan, you can optionally choose to leave these hangers in the slots which
effectively serve as a pivot to allow the pan to drop down for service access.
Its a minor hassle to wiggle the hangers loose or to re-install them if you do
decide to completely remove the belly pan. I recommend that you completely remove
the belly pan as it will afford you an opportunity to get an unobstructed view
of the engine area and clean up any oil or fluid drips, not to mention the
ability to retrieve that nut, bolt, or wrench that you dropped through the engine
area.
 There
are four 13mm hex-head bolts pretty much in the four corners of the belly-pan.
You'll want to use a socket wrench with a long extension for removing the bolts.
There is one in each of the two front corners behind the bumper/grill area and
one on each side further back but still in front of the front wheels. There
are four 13mm hex-head bolts pretty much in the four corners of the belly-pan.
You'll want to use a socket wrench with a long extension for removing the bolts.
There is one in each of the two front corners behind the bumper/grill area and
one on each side further back but still in front of the front wheels.
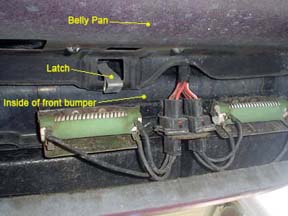
After you find and remove these four bolts, the
belly-pan will drop down about an inch or so -- it's a good way to know that you've
removed the right four bolts. The thing holding it in that position is a primitive
latch in the middle front of the belly-pan right behind the bumper and the two
rear brackets which fit into a slotted holder. Press and release this front latch
and the belly-pan will hinge downward from the hanger brackets at the rear. It
will drop down up front so be ready to catch it.
To completely remove the belly-pan, slide the entire thing
forward until the back brackets drop out of their slots. Now wrestle the pan straight
forward along the ground and out through the front until it is completely free
of the vehicle area. Contrary to what others may have said, the pan is only thin
sheet metal and not a skid-plate made of heavy metal. It probably weights about
20 pounds maximum. You can check the inside of the pan for any tell-tale evidence
of leakage and give it a little clean-up while in there.
3. DRAIN THE OIL
Raise the hood and remove the oil filler tube cap. Having the
cap off will help drain the oil faster and more completely. Put a proper capacity
pan underneath the area of the oil drain plug to catch the oil. This plug is located
in the side of the big black painted engine crankcase pan. You may want to put
down some cardboard or plastic under the whole area to save your driveway or ground,
because it will be a one-foot drop to the pan, and even a slight wind will cause
the oil flow to spray everywhere. Unscrew the oil drain plug using a 19mm wrench
or socket.
Let the oil drain COMPLETELY. Clean the area around where the
drain plug screws in and clean the drain plug itself making sure that the threads
are clean with no dirt or contaminants. Screw the drain plug back in being careful
not to strip the threads. It is inserted at a somewhat unusual angle, so be patient
and make sure you have it lined up properly. You should be able to tighten it
almost all the way by hand, and then just turn it a little more with a wrench
to make sure it is tight. Wipe off any oil drips around the oil drain plug, so
you'll be able to check for leaks once you add the new oil.
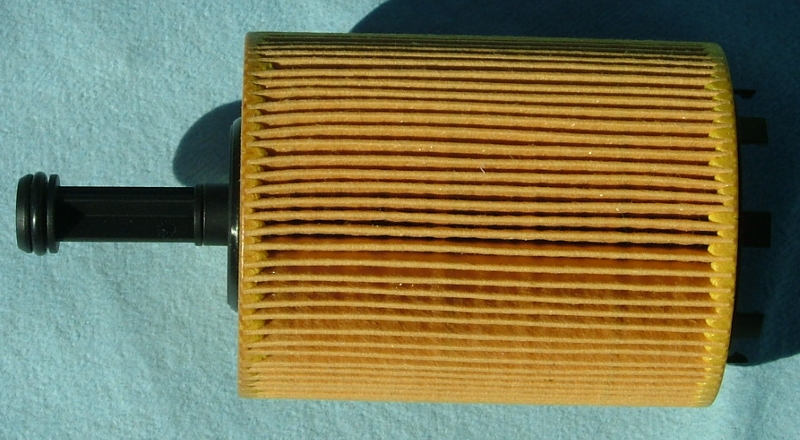
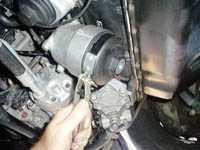
4. REMOVE THE OLD OIL FILTER
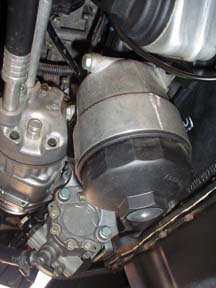 The
oil filter canister has a black cap which faces down at a slight angle. Keep in
mind the actual oil filter is an internal element, and the replacement filter
will not have the metal casing that is around most other commonly used "spin-on"
type filters. If you unscrew the cap, oil will start to leak everywhere so it
is best to first remove the bottom drain plug. Use a 6mm hex wrench to remove
a plug bolt to drain the oil from inside of the canister which avoids the big
mess of the oil spilling out when the cap is first loosened. With the oil drained,
use either a large Crescent type wrench or a 36mm socket on the bottom hex nut
to remove the cap. Alternatively you can use one of the band-type filter removing
tools. The
oil filter canister has a black cap which faces down at a slight angle. Keep in
mind the actual oil filter is an internal element, and the replacement filter
will not have the metal casing that is around most other commonly used "spin-on"
type filters. If you unscrew the cap, oil will start to leak everywhere so it
is best to first remove the bottom drain plug. Use a 6mm hex wrench to remove
a plug bolt to drain the oil from inside of the canister which avoids the big
mess of the oil spilling out when the cap is first loosened. With the oil drained,
use either a large Crescent type wrench or a 36mm socket on the bottom hex nut
to remove the cap. Alternatively you can use one of the band-type filter removing
tools.
With the cap removed, pull the filter element off the cap and
make a mental note of which end went in first. You can't really get it backwards
but by examining it now will make it easier when putting in the new one. Remove
the old O-ring from around the edge of the cap. A new replacement one should have
come with your new filter. You might need to use a pair of needle-nose pliers
to get a good grip on the old O-ring or use a small flat tip screwdriver to lift
it out of its groove. Use a clean rag to wipe out the inside of the cap and the
threads. Make sure you remove all dirt and small particles in the o-ring groove.
Put a little new oil on the new O-ring to lubricate it and then put it in the
same groove around the lip of the cap where you pulled the old one off. Make sure
it is in the groove or you'll end up with leaks. Do NOT try to re-use the
old O-ring as more than likely a slow dripping leak will occur.
5. INSTALL THE NEW FILTER
Special Note:On the filter for the AXK, 24 valve engine, the picture on the left below shows
how the filter looks out of the box. The "snout" may be removed before installation, as shown on the right,
otherwise the filter may get deformed when installed. Some of the cheap filters copied
this wrong and the stem isn't removeable, so it has to be cut off.
It's only there to hold the small o-ring for the drain plug on the filter cap.
(Click on photo for larger version.)
 Properly
orient the correct end of the new filter in place in the cap, pressing firmly
until it snaps in place. Make sure to clean all of the threads on the cap. Take
the cap with new filter and new O-ring installed on it and careful screw it back
into place in the canister. It should turn easily all the way by hand. If not,
be careful -- you're probably stripping the threads on the cap. Properly
orient the correct end of the new filter in place in the cap, pressing firmly
until it snaps in place. Make sure to clean all of the threads on the cap. Take
the cap with new filter and new O-ring installed on it and careful screw it back
into place in the canister. It should turn easily all the way by hand. If not,
be careful -- you're probably stripping the threads on the cap.
After tightening it flush by hand, give it another very small
fraction of a turn with wrench, but don't over-tighten! Again, clean up the area
around the cap and filter canister so that you will be able to easily check for
leaks.
6. ADD NEW OIL
With the vehicle still up on the ramps, add five quarts of
new oil via the oil filler tube accessed from the top of the engine. Using an
in-expensive funnel helps keep the top of the engine clear of oil drips. You may
want to use an old rag or shop cloth and wrap around the area of the oil fill
tube just in case you get a little sloppy.
Put the oil filler tube cap back on, ensuring it is screwed
on tight. Check for immediate leaks around the oil filter canister area and the
oil drain plug. Tighten SLIGHTLY if there are leaks. Do not replace the belly-pan
just yet.
7. CHECK FOR LEAKS AND REINSTALL THE BELLY-PAN
With the belly-pan off and the vehicle still raised and secured
on the ramps, make sure you have added at least 5 quarts of new oil, and then
start the engine and allow it to idle in place for approximately two minutes,
just enough to warm up the oil and get it thoroughly circulated through the engine.
Do not crawl underneath the engine while it is running but bend over and examine
all around the drain plug and oil filter area. If you see any evidence of leakage,
immediately stop the engine and correct the cause of the leak.
Once you are satisfied that there are no oil leaks, shut off
the engine and replace the belly-pan. If you completely removed the belly-pan,
slide it back into place and engage the two back brackets into their holes. Now
lift the front edge of the pan and allowing it to slide forward slightly on the
back brackets. The holes in the back brackets will align with the two threaded
studs hanging down. The front end of the pan should snap over the latch in the
front which will temporarily hold it in place.
Replace and loosely tighten the two 10mm nuts at the rear brackets.
Replace all four 13mm hex-head bolts. You may want to loosely install all four
bolts before re-tightening them all. This allows for some slight movement and
adjustment that may be necessary to get all four bolt holes lined up. Don't forget
to fully tighten the two 10mm nuts at the rear brackets.
8. CHECK LEVELS AND FOR LEAKS (yes, again)
Remove the blocks from the back tires, start the engine, and
back off the ramps and move the vehicle to a flat level area. Put the Rialta in
park, set the emergency brake, and turn off the engine. Wait about two minutes
for all engine oil to re-collect in the bottom of the engine crankcase. Check
the oil level using the dipstick. For those not in the know, you need to pull
out the dipstick and wipe it off with a clean, lint-free cloth. Re-insert the
dipstick in the tube and make sure it is in all the way. Wait about 5-10 seconds.
Pull the dipstick back out and check the level. If it is within the acceptable
levels (see the EuroVan manual), do not add more oil.
If the level is too low, add a LITTLE more oil from the sixth
quart of oil, checking the level with the dipstick between each adding. On mine, I end up
around 5.4 quarts total. Do NOT
overfill because excess oil will be churned out in the exhaust and possibly destroy
the catalytic converter.
You should now be completely finished. Look around and make
sure you don't have any bolts or parts left over!
9. CLEAN UP
Now you're just left with clean-up. Make sure you dispose of
the used oil AND filter element properly. Let's keep them out of the landfills
and other improper dumpsites. Most AutoZones and other major auto supply stores
provide disposal of used oil and some will take the filter as well. Some municipal
garbage collection services will take your used motor oil if you pour it back
into the empty screw top containers that you used. This is an important step in
the process -- do the right thing or just have a professional change your oil.
SUMMARY
Make sure you make some kind of a log entry in your VW EuroVan
Maintenance Book that you changed oil and/or filter. Make a note of the odometer
reading and the date. If the need ever rises for a warranty claim, these log entries
should suffice and indicate that you took reasonable care of the vehicle as prescribed
by VW. Your warranty does NOT require that you have a VW dealer perform this simple
maintenance.
That's it. Although it might sound like quite a job for a first-timer,
if you've ever done an oil change before, most of this stuff should be second
nature to you. Now that you're done, pat yourself on the back for saving about
$100-150 some RV dealership charge for an oil change.
Now, done with your Oil Change on your 2000 EuroVan chassis
vehicle but want to reset your "Service Engine" light if it's flashing? See the
"Service Reminder Indicator" section on this
page.
Service Reminder Indicator (SRI)
The model year 2000 EuroVan included an automatic Maintenance Reminder system
that would flash the "Service OIL" or "Service INSP" light that
on the instrument cluster where the trip odometer miles are normally displayed.
This reminder will flash for about two minutes when you first start the engine
and then it will go out automatically. This is NOT an indication of a malfunction
but rather just a friendly service reminder that VW calls the "Service Reminder
Indicator" (SRI) display. It is interesting to note that only the 2000 EuroVan
has this feature and it is not found on any other model of car in the VW line
or any other production year. Apparently they figured out that it was a bad idea,
something it took the owners less than a week to come to the same conclusion.
Please note that this is NOT the "CHECK ENGINE" yellow icon that
may display in the center area of the instrument cluster. That "CHECK ENGINE"
display is an indicator that the engine computer has noted some type of fault
that needs to be diagnosed by a VW dealer.
When the VW dealer performs the oil change, one part of the procedure involves
hooking your vehicle up to the computer system which normally will download your
vehicle VIN and mileage information into a database that is supposedly available
at any dealership. In other words, you can be at any VW dealership and they can
tell via the database information if your vehicle received all the required maintenance.
However, there is a problem with VW dealers servicing Rialtas in that a lot of
them have the heavy duty hydraulic lifts required for the Rialtas installed at
the exterior of the service bays and therefore the computer hook-up may or may
not be available. Some dealers will manually reset the service mileage reminder
and some are totally ignorant of the procedure required.
And after 5 years of research, I was finally able to determine that the mileage
interval is hard coded into the Engine Control Module for illuminate the "Service
Oil" indicator every 7,500 kilometers (4,660
miles).
Here is the method to manually reset the SRI after performing a service:
-
Switch ignition OFF.
-
Press and hold down the trip odometer reset button at the lower right of
the instrument cluster.
-
Switch ignition ON and release the trip odometer reset button. It is not
necessary to start the engine; merely turn the key until the ignition is ON.
-
The trip mileage area now displays "Service OIL".
-
If trip odometer reset button is now pressed again, the display turns to
"Service INSP". Pressing the button again will cycle the display back
to "Service OIL".
-
When the reminder that needs to be reset (either OIL or INSP) is displayed,
turn button for setting the clock (at lower left of instrument cluster) to the
right. The display changes to "Service ----". That reminder is now reset.
-
The second reminder is unaffected unless it is displayed by pressing trip
odometer reset button and the clock button is turned right again.
-
Switch ignition OFF and back ON to resume normal display.
|