|
|
|
|
Specifications:
| |||||||
|
Recommended tools: |
|
|
Battery hydrometer (about $3) |
|
|
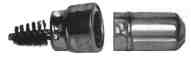
Battery wire brush post cleaner (about $3) |
|
Unfortunately, it is practically impossible to check the electrolyte level because the battery is located so far into the engine compartment. To do a complete check it is necessary to remove the battery and examine the acid levels in a more convenient location. No thanks to Volkswagen for making this design error and adding a difficulty level to what should be simple maintenance. But this now has a blessing in disguise. By removing the battery, you get to do a thorough and complete check of all the other items. You can even invest in an in-expensive battery hydrometer to check the specific gravity of each cell. And once you get used to the method, it doesn't take any longer than 15-20 minutes for the complete procedure. Simply use the following steps for battery replacement. While you have the battery out, if you find any problems such as one dead cell, you can then take the battery to your nearest auto parts store and get a free battery test performed.
 Cleanliness
is important for the battery, cables, and surrounding metal areas. With the battery
removed from the vehicle, it makes it very easy to use a garden hose to clean
off and dirt and corrosion from the battery. Some people advocate using baking
soda which neutralizes the acid which may be found on the battery but if you do,
BE VERY CAREFUL TO NOT GET ANY BAKING SODA OR RINSE WATER SOLUTION INTO THE FILLER
CAPS!
Cleanliness
is important for the battery, cables, and surrounding metal areas. With the battery
removed from the vehicle, it makes it very easy to use a garden hose to clean
off and dirt and corrosion from the battery. Some people advocate using baking
soda which neutralizes the acid which may be found on the battery but if you do,
BE VERY CAREFUL TO NOT GET ANY BAKING SODA OR RINSE WATER SOLUTION INTO THE FILLER
CAPS!
Use a battery post cleaning tool to clean the lead terminal posts until you see bright shiny metal. Use the same tool or similar wire brush to clean the insides of the cable connectors.
Examine the painted battery tray and surrounding area in the engine compartment. Use a garden hose and cleaning rag to remove any dirt or corrosion. If you see a build-up of acid or corrosion in one spot, wet the area thoroughly and sprinkle liberally with baking soda to neutralize any remaining acid. Use a soft scrub brush or even an old tooth brush to insure the baking soda solution enters any seams or hard-to-get areas. Flood liberally with water. Any areas in which the paint has been corroded away should be sanded smooth, primed, and re-painted as necessary.
 Before
re-installing the battery, remove the small brown wires that are attached to the
negative cable. Use sandpaper or emery cloth to remove any corrosion or oxidation.
The spade terminals should be bright shiny metal before reattaching them. Do the
same for the small red wire connected to the positive cable.
Before
re-installing the battery, remove the small brown wires that are attached to the
negative cable. Use sandpaper or emery cloth to remove any corrosion or oxidation.
The spade terminals should be bright shiny metal before reattaching them. Do the
same for the small red wire connected to the positive cable.
[ return to top ]
Purchase your replacement battery first. You may wish to remove the old battery ahead of time by following the procedure below to insure that you get the same exact size and BCI Group number. Usually you will have to pay a core charge of about $8 if you don't have the old battery to exchange at the time of purchase but you can always return it later for a refund of your core charges.
Decide if you want to save engine computer and radio settings. If you disconnect the battery, all engine control settings are lost as are your saved radio channels.
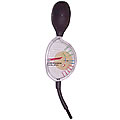
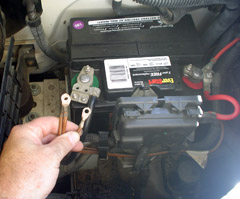
You can purchase or fabricate a tool similar to the one pictured which plugs into the cigarette lighter and provides enough power through a 9 volt alkaline battery to maintain those computer settings while you change the battery. Or connect another battery using jumper cables which will supply the power while you change out the actual car battery. If you use an adapter which plugs into the cigarette lighter to provide enough power through a 9 volt alkaline battery to maintain those computer settings while you change the battery, you should remove that adapter soon after you connect the new battery to avoid overheating that little 9V battery. Even if you use a rechargeable 9 Volt battery, it's taking an overcharge connected to the 12V battery & may pop if left connected too long.
But there is good news for you Rialta owners. You already have a backup battery: namely, the coach batteries. You just have to know how to connect them all together at the same time while you replace the engine battery. One method would be to hire somebody to sit in the driver's seat and hold down the overhead button that is supposed to do this just in case you need to start the vehicle and your engine battery is dead. On a more practical manner, just follow this procedure. Open the coach battery compartment and connect one end of a clip lead to the positive post of either battery and the other end to the small terminal on the solenoid. The solenoid will click on. All three batteries are now connected together and 12 volts are supplied to all functions in the engine compartment.
Even if you don't bother with saving all the computer data, no harm is done and the engine will quickly adapt to your driving habits and fully restore the necessary information all within a few hours of driving. You will have to manually reset your radio channels.
Remove the negative cable first. This is done first so that while removing the positive cable, if your wrench accidentally touches the metal body or other ground point, you won't create a huge shower of sparks.
Remove the positive cable.
Remove the hex head hold down bolt that is located towards the bottom center just underneath the black plastic fuse box that is in the way. Note that with the bolt removed, the hold down clamp is part of the bracket assembly that holds the fuse box. It is not necessary to remove the fuse box or the bracket. They will move slightly out of the way to allow access to the battery.
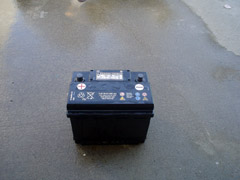
Lift and remove old battery. Be careful not to tip and spill any acid while moving it.
Inspect battery tray and surrounding area. Clean if necessary as detailed in the maintenance section above.
Insert new battery into tray in the same alignment as the old one. The positive terminal always connects to the red cable.
Connect hold down bolt. This make take some fidgeting to get the bracket and clamp in the right position.
Connect positive cable.
Connect negative cable.
Other things to do while you're in there: clean the battery terminal posts and the insides of the cable connector until you see bright shiny metal. Remove all the accessory wires with the spade terminal that are connected to either cable and use sandpaper or emery cloth to clean the terminal contacts making sure that all corrosion is removed. Inspect and clean the ends of all cables. Apply a light coat of petroleum jelly on any exposed copper stands to keep them from corroding. I recommend the use of those 99 cent anti-corrosion cloth washers colored red and green as shown in this picture. You should periodically check the battery terminals and posts for corrosion or a lead oxide build-up which will weaken the electrical contact. Sometimes you may find that the vehicle just won't crank over even though everything supposedly checks out. In that case, try removing the terminals, clean away all deposits, and re-attach the terminals bringing the bolt up to proper tension. You'd be surprised at how many times this little step solves major problems.
[ return to top ]
|
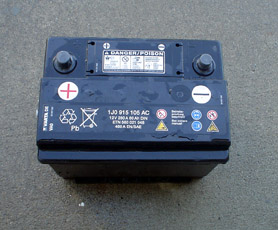
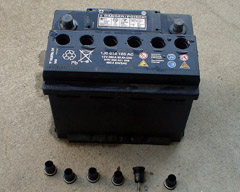
 In
spite of what appears to be a "maintenance free" battery, the OEM battery needs
to have the electrolyte levels checked at least every 6 months. Upon first viewing
this battery, you may think that there is no way to add water to the battery.
Volkswagen has played a dirty trick on its owners by having a solid black decal
applied over the cell covers so that it would appear there is no way to check
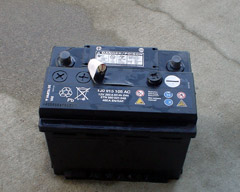
the electrolyte level. But by peeling back and removing this non-essential decal,
the standard screw-on caps for each cell of the battery are revealed. Use only
distilled water to add to each cell if needed.
In
spite of what appears to be a "maintenance free" battery, the OEM battery needs
to have the electrolyte levels checked at least every 6 months. Upon first viewing
this battery, you may think that there is no way to add water to the battery.
Volkswagen has played a dirty trick on its owners by having a solid black decal
applied over the cell covers so that it would appear there is no way to check
the electrolyte level. But by peeling back and removing this non-essential decal,
the standard screw-on caps for each cell of the battery are revealed. Use only
distilled water to add to each cell if needed.