|
[ HOME ]
|
|
Model Information
|
|
|
|
VW Service
|
|
|
|
Winnebago Service
|
|
|
|
Tours & Pictures
|
|
|
|
►
Related
Links
|
| |
On this page:
Maintenance
 Volkswagen
recommends a complete check for damage or leaks, brake pad thickness, and
a check of the fluid level every 10,000 miles. They also recommend that you change
the brake fluid every two years regardless of mileage. Use only DOT-4 brake fluid. Volkswagen
recommends a complete check for damage or leaks, brake pad thickness, and
a check of the fluid level every 10,000 miles. They also recommend that you change
the brake fluid every two years regardless of mileage. Use only DOT-4 brake fluid.
A complete visual inspection of the brake area can be accomplished
much easier if the wheel is removed in order to gain access. You should also inspect
the surface of the disc rotor and see if there is any abnormal grooving or pitting
occurring. If the rotors don't look smooth and shiny, then the brake pads have
worn unevenly and a further diagnosis might be needed. Also look for any grease
or oil on the disc or brake pads which could indicate a leaking brake line or
caliper seal.
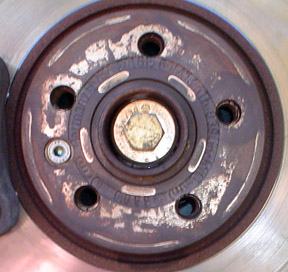
I strongly suggest that if you go to the trouble of removing
the wheel to inspect the brakes, that you take a photograph of both the front
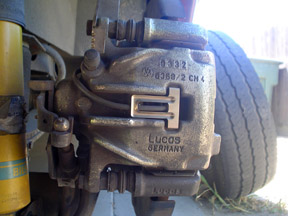
and rear caliper assemblies. Additionally, you should examine each caliper to
see if you can determine the brand name, either Lucas-Girling or ATE and the VW
part number of the disc rotor. This part number is cast into the ring which is
in-between the five lug bolt holes and the center hub. Write this information
down as it will become very valuable whenever you need to order new brake pads.
[ return to top ]
Replacement Labor, Tips, and Tools
NOTE - In order to replace the rear axle brake pads, you need
to turn the piston as you compress the caliper. This tool is available at Pep
Boys and other similar auto parts stores for as little as $12.
You can consult this
Glenn-Mitchell Brake Repair booklet
but note that it was originally intended for the VW Passat but also contains specific
information about the EuroVan. Procedures for brake repairs on both vehicles are
nearly identical anyhow. Otherwise, follow the advise from some other owners as
detailed below.
From the Yahoo EV_Update Group (12/31/04):
Replaced original rear brake pads after "Check Brake Pad" light illuminated
at 75,000 miles. New OEM pads obtained from Steve Schock at
europarts-sd.com for
$84.95 plus shipping. Upon removal, old pad plus backing plate measured 10.3 mm
(new is 13.5 mm; minimum is 8.5 mm), thus, at that rate I had 42,000 more miles
before replacement limit was reached. Brake disc measured 12.47 mm (new rotor
is 13.5 mm, minimum is 11.5 mm).
Replacement of one wheel's pads at a time was fairly simple using
following procedure.
-
Block front wheels to stabilize EV.
-
Release parking brake.
-
Jack up EV and support with jack stand.
-
Remove wheel.
-
Remove parking brake cable (its end is bulb-shaped and can be
slipped off the arm on the brake-carrier by using a screwdriver).
-
Disconnect wear sensor harness connector.
-
Remove and dispose of the two 13 mm attachment bolts from the
brake caliper housing using a 16 mm thin open-end wrench to prevent the guide
pins from turning.
-
Remove brake caliper housing by prying with large screwdriver
and support the housing to prevent damage to brake hose.
-
Pry off and dispose of retention spring that clips into brake
caliper housing to secure wire for wear indicator.
-
Remove and dispose of brake pads.
-
Replace brake pad retention plates (new plates provided with
new pads).
-
Compress brake caliper while turning caliper clockwise (using
a piston resetting tool makes this step simple). Caution is required to prevent
brake fluid reservoir from overflowing when the brake caliber is compressed.
Some of the fluid may have to be siphoned out.
-
Install new pads in brake carrier.
-
Replace brake caliper housing.
-
Reconnect wear sensor harness connector and secure both the
bracket and the brake caliper housing with two new self-locking 13 mm bolts
(provided with new pads) tightened to 25 ft-lb.
-
Install new retention spring (provided with new pads) (see
step #9).
-
Reconnect parking brake cable.
-
Replace wheel and torque lug bolts to 130 ft-lb.
-
Depress brake pedal several times to seat brake pads in their
normal operating position.
-
Check brake fluid level in reservoir.
Good luck,
Bob Williams
2001 Weekender
From: "yanksrv <jdr56@...>"
Subject: [Rialta-Tech] How to on brakes
How to change the brakes on a 2000 QD.
Check to make sure that you have everything that you need to
do the job completely and safely. The task is an easy one but you need to double
check that you have the RIGHT PADS. Once you are sure that the pads are correct
then the real fun begins. (Don't trust anyone; check the pad yourself).
-
Jack up the front end (I did one side at a time) and place
a jack stand under the vehicle and remove the tire.
-
Once you have the tire off inspect the rotor for abnormal
wear (deep groves or outside edge). If any is found, you need to have the rotors
turned. I think anything under .800" means you have to replace the rotor.
-
Remove the cover off your brake fluid reservoir and place
a clean rag over it.
-
Next pry the pad on the inside to the rear to return the
cylinder back so you can slide in the new pads.
-
To replace the pads there is a green color clip that needs
to be removed and the two pins slide to the inside and the pads will lift out.
-
Match up the pads slide them into place there will be a spring
like thing on the inside pad that will need to be pressed down to slide the
pins back in place. Then replace the green pin and put everything back in its
proper place.
-
Note: if rotor has to be replaced or resurfaced there are
two 19mm bolts on the backside of the spindles that you have to remove. The
bolts are in there SUPER TIGHT so be careful.
Now for the rear brakes; it's almost the same except for small
differences.
-
There are two bolts at the top of each caliper that come
with your new brakes that you have to loosen (a pair of vice grips work wonders
here) make sure that the inside bolt is not turning if so vice grip it.
-
Then remove and replace the pads
-
THIS IS THE TRICKY PART (almost cost me a bunch of money).
THE REAR CALIPER IS THE SCREW DOWN TYPE AND YOU NEED A SPECIAL TOOL TO GET CALIPER
BACK SO YOU CAN PUT IT BACK TOGETHER.
-
Once you have got this far and all your hair is intact and
the dog is still your buddy its time to check all bolts and lug nuts to ensure
that they are tight and your good old bottle of DOT4 brake fluid has been used
to top off the brake fluid reservoir. Pump the volume on the brake pedal
and clear the driveway of any thing that you don't want to hit in case you forgot to
do something while you have undertaken this job. And venture out into the world
knowing that you have done this yourself.
-
If something goes wrong or gets broken (other than knuckles)
go to your nearest shop and ask for help.
[ return to top ]
Replacement Parts:
Purchasing replacement brake pads for a Rialta really breaks down into two
separate chores:
- Determining the correct pads for the front axle... which is easy.
- Determining the pads for the rear axle... which may not be so easy.
Front Axle:
First of all, you must know the model year of the EV chassis
upon which your Rialta is based. It may be up to three years earlier or it may
be the same year. You can only tell by the
VIN. Now knowing
which year of EuroVan you have, the choice of brake pads breaks down into three
categories:
- 1999 and earlier
- 2000
- 2001 and later
Aside from size differences, the 1999 and earlier have no
wear sensors. The year 2000 should have one wear sensor on the left front wheel.
The 2001 and later models will have a wear sensor on both front wheels.
The 2000 and later models are a known brand and size. Getting
the correct pads should be easy if you check the chart shown below. However,
the 1999 and earlier models will have either the Lucas-Girling brake caliper
or the ATE brake caliper. The pads are not interchangeable and you will need
to identify which caliper is on your vehicle before you order. Check front calipers
carefully as there are several different pad/caliper versions. Girling: pads
are rectangular & held by 2 pins. ATE pads are arched and have "ears" on either
side.
Model Year
of EV Chassis |
Front
Caliper
|
Front Rotor |
Front Wear
Sensors |
VW Brake
Pad Number |
| 1995 |
Lucas: 701 615 123C
(L)
Lucas: 701 615 124C (R)ATE (?)
|
280 x 24mm
701 615 301D |
none |
Lucas:701 698 151G
ATE (?) |
| 1996 |
Lucas: 701 615 123C
(L)
Lucas: 701 615 124C (R)ATE (?)
|
280 x 24mm
701 615 301D |
none |
Lucas:701 698 151G
ATE (?) |
| 1997 |
Lucas: 701 615 123C
(L)
Lucas: 701 615 124C (R)ATE: 7D0 615 123 (L)
ATE: 7D0 615 124 (R)
|
Vented
7D0 615 301C |
none |
Lucas:701 698 151G
ATE: 7D0 698 151 |
| 1998 |
Lucas: 701 615 123C
(L)
Lucas: 701 615 124C (R)ATE: 7D0 615 123 (L)
ATE: 7D0 615 124 (R)
|
Vented
7D0 615 301C |
none |
Lucas:701 698 151G
ATE: 7D0 698 151 |
| 1999 |
Lucas: 701 615 123C
(L)
Lucas: 701 615 124C (R)ATE: 7D0 615 123 (L)
ATE: 7D0 615 124 (R)
|
Vented
7D0 615 301C |
none |
Lucas:701 698 151G
ATE: 7D0 698 151 |
| 2000 |
Lucas-Girling or ATE |
Vented
7D0 615 301C |
Lucas: LF Only
ATE: none |
Lucas: 701 698 151C
ATE: 701 698 151 |
| 2001 |
ATE
7D0 615 123C(L)
7D0 615 124C (R) |
313mm
7M3 615 301 1 |
Both |
7M3 698 151A |
| 2002 |
ATE
7D0 615 123C(L)
7D0 615 124C (R) |
313mm
7M3 615 301 |
Both |
7M3 698 151A |
| 2003 |
ATE
7D0 615 123C(Left)
7D0 615 124C (Right) |
313mm
7M3 615 301 |
Both |
7M3 698 151A |
NOTES -
1.
This first 955 units built by VW for the 2000 model year used 300mm rotors instead
of 313mm. The brake pads are smaller.
Rear Axle
 At
this point in time I am unsure of how Winnebago followed the brake changes initiated
by Volkswagen. Winnebago purchased the brake and hub parts in bulk. In other
words, each empty EuroVan chassis received by Winnebago did not come with a
box of brakes parts. If it did, then we could be fairly sure that the rear brakes
were the same on the Rialta as the regular EuroVan. Because Winnebago purchased
the brake parts separately, one scenario could see left over older style parts
being installed on a newer EuroVan chassis. Another scenario could have one
vehicle coming off the assembly line with the last of the old parts while the
very next vehicle could have the newer parts being used. So the actual year
of the EuroVan chassis and even the Rialta are not really definitive tools in
determining which brakes were used. However, if parts from one older design
were used on a few of the newer Rialtas, those would probably be an exception
rather than a rule. Generally speaking, you can use the following chart which
is based on the model year of the Rialta Coach. At
this point in time I am unsure of how Winnebago followed the brake changes initiated
by Volkswagen. Winnebago purchased the brake and hub parts in bulk. In other
words, each empty EuroVan chassis received by Winnebago did not come with a
box of brakes parts. If it did, then we could be fairly sure that the rear brakes
were the same on the Rialta as the regular EuroVan. Because Winnebago purchased
the brake parts separately, one scenario could see left over older style parts
being installed on a newer EuroVan chassis. Another scenario could have one
vehicle coming off the assembly line with the last of the old parts while the
very next vehicle could have the newer parts being used. So the actual year
of the EuroVan chassis and even the Rialta are not really definitive tools in
determining which brakes were used. However, if parts from one older design
were used on a few of the newer Rialtas, those would probably be an exception
rather than a rule. Generally speaking, you can use the following chart which
is based on the model year of the Rialta Coach.
Fortunately, the rear brake design breaks down into one of two categories:
- 280mm diameter rotor; No wear sensors or only one sensor on the right
rear = 2001 Rialtas and earlier design
- 294mm diameter rotor; Two sensors total (one on each wheel) = 2002 Rialtas
and later design
Model Year
of Rialta Coach |
Rear
Caliper |
Rear Rotor
|
Rear Wear
Sensors |
VW Brake
Pad Number |
| 1995 |
? |
? |
none |
? |
| 1996 |
? |
? |
none |
? |
| 1997 |
Lucas-Girling |
280 x 12mm
701 615 601A 1 |
none |
7D0 698 451E |
| 1998 |
Lucas-Girling |
280 x 12mm
701 615 601A 1 |
none |
7D0 698 451E |
| 1999 |
Lucas-Girling |
280 x 12mm
701 615 601A 1 |
none |
7D0 698 451E |
| 2000 |
Lucas-Girling |
280 x 12mm
701 615 601A 1 |
RR Only
2 |
7D0 698 451G
2 |
| 2001 |
Lucas-Girling |
280 x 12mm
701 615 601A 1 |
RR Only
2 |
7D0 698 451G
2 |
| 2002 |
Lucas-Girling |
294 x 13.5mm
7D0 615 601C (?) |
Both |
7D0698 451F
3 |
| 2003 |
Lucas-Girling |
294 x 13.5mm |
Both |
7D0698 451F
3 |
| 2004 |
Lucas-Girling |
294 x 13.5mm |
Both |
7D0698 451F
3 |
| 2005 |
Lucas-Girling |
294 x 13.5mm |
Both |
7D0698 451F
3 |
Notes -
1. Original disc rotor
701 615 601A superseded by 7D0 615 601B.
2. OEM VW Pads 7D0 698
451G with one sensor installed but Winnebago did not wire to the connection.
Replacements can be pads without sensors 7D0 698 451E (much cheaper).
3. This OEM pad 7D0698
451F has wear sensors for both rear wheels. If the sensors were not wired
to the connectors by Winnebago, then replacements can use the cheaper pads
without sensors.
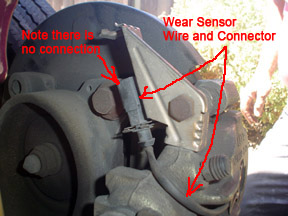 Pay
special attention to note #2 and #3 above. Apparently Winnebago never bothered
running any wires back to the rear brake sensor(s) used on 2000 and later models.
All Rialtas that are based on the 2000 EuroVan (includes some 2000 Rialtas and
all 2001 Rialtas) have brake pads with one sensor at the right rear wheel and
I now know for a fact that this one sensor has no wiring connection completed
by Winnebago. So it is much cheaper to use the pads without sensors. These pads
are the same used on the 1999 and earlier models. So here we have our first
category of replacement pads: any 280mm diameter rotor can use 7D0 698 451E
pads without any sensors. Pay
special attention to note #2 and #3 above. Apparently Winnebago never bothered
running any wires back to the rear brake sensor(s) used on 2000 and later models.
All Rialtas that are based on the 2000 EuroVan (includes some 2000 Rialtas and
all 2001 Rialtas) have brake pads with one sensor at the right rear wheel and
I now know for a fact that this one sensor has no wiring connection completed
by Winnebago. So it is much cheaper to use the pads without sensors. These pads
are the same used on the 1999 and earlier models. So here we have our first
category of replacement pads: any 280mm diameter rotor can use 7D0 698 451E
pads without any sensors.
At this point, I don't have any proof that the later models
with the 294mm discs and sensors on both wheels do or don't have the wiring
completed to both rear wheel sensors. I suspect that they don't ,in which case,
the replacement pads do not have to have the more expensive wear sensors.
There is one possible more way to determine what brand of
brakes you have. On the data plate of your EVC (the white sticker located on
the fuse panel cover) the brakes are designated. If you look at the bottom half
of the sticker, there are a bunch of 3 letter and number codes. It looks like
a chart (6 columns by 5 rows). If you look over on the 4th column then the third
row, you will see the brake code. It should be one of these (threw in the 15"
wheel EV's from1997 on up):
1LU = 15" fist caliper FN3
1LP = 15" Lucas fist caliper C54
1LE = 15" Lucas frame caliper RC 54
1LB = 16" fist caliper FN3
1LB = 16" fist caliper FNR
As you can see, VW has pretty much offered no help in designating
the 16" wheel calipers. The official designations are the FN3 and FNR. Just
about every 16" wheel EV, I've ever seen, has the FNR brake caliper. It seems
to be the most common for 2001-2003. The calipers do look different and you'll
probably be pulling off the wheel to get a good look. Also, the FNR caliper
has a 313mm diameter brake rotor (as compared to the 300 mm one). As for who
makes each caliper, I have no idea.
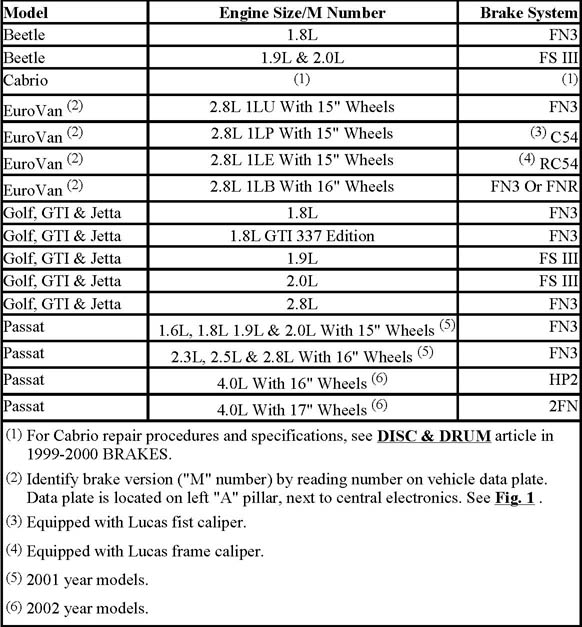
One additional aid to help identify the brake systems on
the 2001-2003 EuroVan chassis would be this
2001-2003 BRAKES Chart:
[ return to top ]
|
