Water Pumps & Filters

[ HOME ]

Model Information

Miscellaneous
Accessories
Floor Plans & Specs
How To Buy Or Sell A Rialta
Known Problem Areas
Modifications, VW & Coach
New to RVing? Info here
Pros & Cons of a Rialta
Vehicle Checklist
VIN Information
Winter RV Storage

VW Service

Air Conditioner
Brakes
Door & Locks
Engine Battery
Engine Repair Information
Filters
Fuses: Dash & Engine
Mechanics & Dealers List
NHTSA Recall Notices
Oil Change
Parts Diagrams
Radiator & Coolant
Serpentine Belt
Service & Tech Bulletins
Spark Plugs & Ignition Wires
Transmission Service

Winnebago Service

Appliance Recalls
Black Bag
Bulbs
Caulking and Sealants
Coach Batteries
Electrical Breakers & Fuses
Furnace & Thermostat
Generator
Microwave, Range & Oven
NHTSA Recall Notices
Operator Manuals
Paint Codes
Parts Catalog
Plumbing Diagrams
Refrigerator
Rialta Service Manual
Service Bulletins
Shocks and Air Springs
Shower
Supplier Links
Tires & Wheels
Toilet
Water Heater
Water Pumps & Filters
Winnebago Corporate Info
Wiring Diagrams

Tours & Pictures

Public RV Sanitary Dumps
Strange & Unusual Places
Winnebago Factory Tour

   ► Related Links


On this page:


Pump Service & Repair:

The Rialta is capable of delivering fresh water from two different sources, the on-board fresh water tank or via the external city water connection. Water from the on-board tank is delivered to the appropriate faucet or fixture via a 12V DC on-demand pump. When connected to the city water supply, the pumps are not needed because of the water pressure induced from the city supply system.

Sooner or later, every Rialta owner has one or more problems associated with the water system. It could be the water heater, the water pumps, or the filters associated with the water pumps.

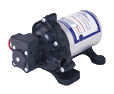
Shurflo Pump Manufacturing Company, Inc.
Costa Mesa CA
Phone: 800-854-3218

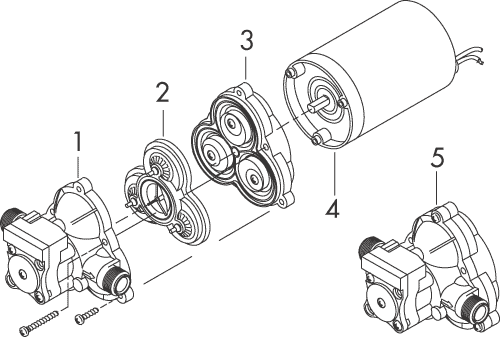
Parts for the Shurflo pumps can be ordered from any RV dealer including many on-line suppliers. Make sure to check the model number on the existing pumps. Usually you do not need to order a complete new pump as the Pump  Head Repair Kit is available. However, there is only a small difference in price between the repair kit and a complete new pump so check the prices before ordering.  The current part number for the replacement is 4088-101-E65.

Name (2088/2093 Series) Premium 12 VDC
 (OEM#)
Premium 12 VDC
 (Aftermarket#)
Model 2088-554-144 2088-554-444
Switch &
Upper Housing (1)
94-231-20 94-231-20
Valve Assembly, EPDM (2) 94-232-06 94-232-06
Drive Housing (3) 94-238-04 94-238-04
Motor (4) 11-173-01 11-173-01
Pump head Repair Kit (5) 94-236-08 94-236-08
Check Valve (not shown) 94-237-00 94-237-00

[ return to top ]


Sanitizing the Water System:

Potable water systems require periodic maintenance to deliver a consistent flow of fresh water. Depending on use and the environment the system is subject to, sanitizing is recommended prior to storing and before using the water system after a period of storage. Systems with new components, or ones that have been subjected to contamination, should also be disinfected as follows:

  1. Use one of the following methods to determine the amount of common household bleach needed to sanitize the tank.

  1. Multiply "gallons of tank capacity" by 0.13; the result is the ounces of bleach needed to sanitize the tank.

  2. Multiply "Liters of tank capacity" by 1.0; the result is the milliliters of bleach needed to sanitize the tank.

Note that the capacity of the fresh water tank on all Rialta models is 20 gallons. Therefore, 20 X 0.13 = 2.60 ounces of bleach are required.

  1. Mix into solution the proper amount of bleach within a container of water.

  2. Pour the solution (water/bleach) into the tank and fill the tank with potable water. If your tank is already partly filled prior to adding the bleach solution, it is advisable to add the bleach, add the remaining water, and then drive the vehicle for a few minutes in order to mix the bleach solution throughout the entire tank.

  3. Open all faucets (Hot & Cold) allowing the water to run until the distinct odor of chlorine is detected at each faucet.

  4. Close each faucet when the odor of chlorine is detected.

  5. The standard solution must have four (4) hours of contact time to disinfect completely. Doubling the solution concentration allows for contact time of one (1) hour.

  6. When the contact time is completed, drain the tank. Refill with potable water and purge the plumbing of all sanitizing solution. Do not forget this step! Run water through all outlets until all odor of chlorine is gone.

[ return to top ]


[ HOME ]
No images, artwork, or photographs may be used without  permission.
Page Updated: 30 March 2013