|
[
HOME
]
|
|
Model Information
|
|
|
|
VW Service
|
|
|
|
Winnebago Service
|
|
|
|
Tours & Pictures
|
|
|
|
►
Related
Links
|
| |
NOTE - The following mod was originally submitted to the
Tech Rally
group on Yahoo by Ray Wilkes in September
2004. (Some additional comments and editing by
Baldy in May 2006. These added comments are
all italicized.) PDF (65KB)
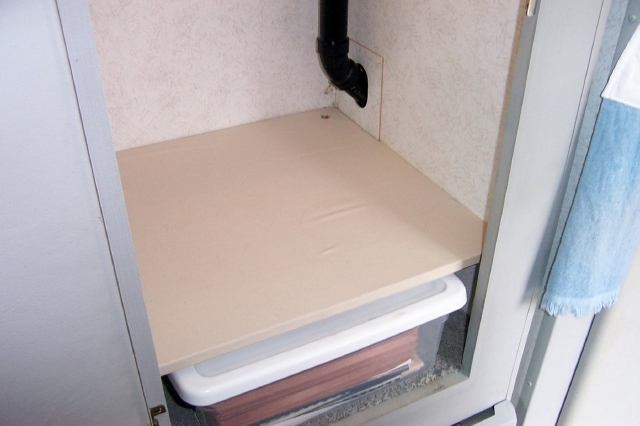
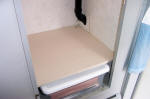
Add a shelf to the lower section of the clothes closet
APPROX. MODIFICATION TIME: 1 hour
PART LIST: (All prices are pre tax)
| Plywood 5/8" thick, 21 1/2" square*** |
$2 > |
| Shelf supports, 4 |
$2 |
| Fabric, carpet tape |
$1 |
| APPROX. TOTAL COST OF PARTS |
$5 |
*** NOTE - 5/8" plywood is more than sufficiently strong enough to carry
the load of shoes and other items placed on top of it. If you don't plan on any
extra heavy items, you can safely use 1/2" thick plywood or particle board. Verify
the actual width and depth of your closet as some vehicle may vary.
TOOLS: Drill
INSTRUCTIONS:
-
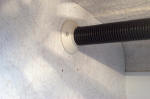
Build a shelf of 5/8" thick plywood, 21-1/2" square, with a 6-3/4" long notch
in the forward left corner to fit the piece of thin plywood Winnebago used around
the vent pipe.
NOTE - Whether using plywood or particle board, sand the edges relatively smooth,
especially the one edge that will be facing the closet door. Even though you may
cover with fabric, splinters can still poke through.
-
Drill 1/4" holes in the forward and aft walls. These holes are located 7"
above the original floor, and at 6" and 16 1/4" out from the back wall, on each
of the forward and aft walls.
NOTE - Depending upon what items you want to easily slide in under this added
shelf, you may have to vary the dimension of 7" above the original floor to suit
your needs. Not all "15-quart boxes" are made exactly the same. Before you increase
this dimension, make sure that shirts, blouses, and pants will all hang without
bunching up on the new closet shelf. Make sure that all 4 support brackets are
located the same exact distance from the existing closet floor.
-
Fit in the 4 plastic brackets. Hold these supports in with masking tape to
make it easier to slide the shelf down.
|
Click to view full size
|
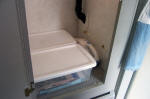
The shelf removed to show where I placed the plastic supports,
and how the 15-quart boxes and dust buster fit in below the shelf.
|
Click to view full size |
The existing clothes rod is raised 3”. The clothes rods seem
to be located at different distances from the ceiling, and in some Rialtas
it is helpful to raise the rod just high enough to still be able to place
hangers over the rod.
|
Click to view full size |
To finish off the shelf, put some plain colored fabric over the top and
edges, and fastened it to the underside of the shelf with carpet tape.
|
Additional Modifications:
|