
|
|
|
|
This page is especially informative for those new to RVing but also for the old-timers who need a little lesson in what sewer related hardware items to have. Here are some items that I wish all RVers would have and use. All of the fittings pictured on this page are usually available through any RV dealer, Camping World, and other places as listed on the "Related Links" page. Also, Wal-Mart usually stocks a limited supply of the most commonly used items.
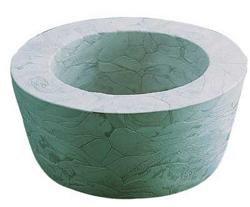
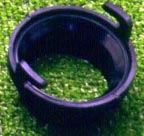
The first item is the "sewage donut" which is nothing more than a very flexible foam rubber ring which effectively seals your sewage hose to the sewer connection in the ground. How many campgrounds have you been in where the air throughout smells like sewer gas. This is because most RVers do not use the donut ring. There are a few campgrounds that post and enforce that rule. I just wish they all did. You may be a little unsure of how to use or install it and that is understandable because it technically does not "fit" into anything. You merely insert this first into the ground sewer pipe and then push your sewer discharge hose into it. With a little bit of pressure you can create an effective seal. This come in handy because the ground sewer pipe is usually a much larger diameter than your sewer hose. The cost for this item is very cheap, approximately $2-3. Get one! And please use it. 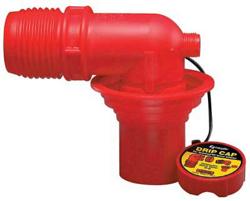
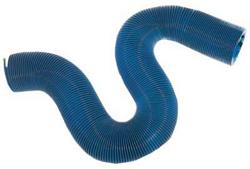 This is the standard sewer hose which is usually sold in 10 and 20 foot lengths. It comes in a variety of brands and colors. The only difference between "standard" and "heavy duty" is the thickness of the vinyl material itself. Normally one hose of 10 foot length will work but only if the sewer pipe in the ground is located very near to the parking area of a camp site. Many times you'll find sewer pipe in the ground may be too far away in order for your short hose to stretch. Campgrounds usually design it this way to keep vehicles from accidentally running over the sewer pipe. I recommend that you buy an extra hose with one "screw-on" connector so that you can connect the two of them and reach the sewer hose in any location. Cost is from $5 to $25 depending on the type that you buy and the length of the hose.
This is the "screw-on coupler" which comes in handy for quickly attaching two hoses together without the hassle of using the hose clamps. If you keep a spare hose to reach sewer pipes that are too far away, then you can use this item permanently installed in one end of the spare hose for easy use whenever needed. The cost is around $7.
Here is all you need to complete a "RVer friendly" sewer connection.....and it totals to around $28:
For storage and day-to-day use, simply push the doughnut onto to bottom down pipe of the sewer elbow where it can permanently remain. Attach the Valterra adaptor to one end of one hose where it will permanently remain. Attach the screw-on hose connector to one end of the other hose where it can permanently remain. You store the one hose with the Valterra connector in the Rialta hose storage tube and all the other parts in a large, study plastic bag or box in the rear storage compartment. When you are ready to hook-up to a campground sewer, attach the Valterra adaptor with hose to your dump valve, then attach the sewer elbow to the other end of the hose. If the sewer pipe in the ground is too far away, then add the second hose. Be sure that you do not store any fresh, drinking water hoses in the same storage bag or box as the sewer items. Additional Accessories:
|
|
 This
is the "sewer elbow" which fits right into the sewer donut pictured above. It can
come in several different designs such as the two show here. Some will attach to
the sewer hose using clamps or some will use the screw-on connection pictured here
on the right. In spite of most manufacturer's claims that no additional rubber seals
are needed, they usually do a poor job of fitting and sealing into the ground sewer
pipe. This is due to the different diameters of sewer pipe used in different campgrounds
and sometimes to damage done to the end of the exposed sewer pipe in the ground.
This poor sealing or fitting problem is the reason for using the doughnut seal pictured
above. The cost is less than $10. The straight end pushes down into the sewer donut
and the other end can be either a clamp on connection or a screw-on connection.
The color of the fitting is meaningless and merely a manufacturer's choice. Cost
is usually around $10.
This
is the "sewer elbow" which fits right into the sewer donut pictured above. It can
come in several different designs such as the two show here. Some will attach to
the sewer hose using clamps or some will use the screw-on connection pictured here
on the right. In spite of most manufacturer's claims that no additional rubber seals
are needed, they usually do a poor job of fitting and sealing into the ground sewer
pipe. This is due to the different diameters of sewer pipe used in different campgrounds
and sometimes to damage done to the end of the exposed sewer pipe in the ground.
This poor sealing or fitting problem is the reason for using the doughnut seal pictured
above. The cost is less than $10. The straight end pushes down into the sewer donut
and the other end can be either a clamp on connection or a screw-on connection.
The color of the fitting is meaningless and merely a manufacturer's choice. Cost
is usually around $10.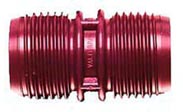
 This
is the standard Valterra straight sewer adaptor that attaches to the dump pipe on
your Rialta when you hook up to the sewer system in a campground. The manufacturer
of the Rialta dump valve is Valterra so your fitting that connects here must be
of the "Valterra" type, which means the fitting will have the two large "ears" which
connect to the two large lugs on the dump valve pipe. This fitting is normally attached
to one end of the sewer hose using a hose clamp. To store this fitting and the attached
hose in the Rialta hose storage compartment, simply push the end of the hose without
the fitting attached into the storage tube. The actual fitting will not enter the
storage tube but will remain on the outside where the storage strap will snap in
place to hold it securely. After repeated use you may find that one of the locking
tabs may start to break off. Don't worry, even Wal-Mart has replacements and the
cost is around $3.
This
is the standard Valterra straight sewer adaptor that attaches to the dump pipe on
your Rialta when you hook up to the sewer system in a campground. The manufacturer
of the Rialta dump valve is Valterra so your fitting that connects here must be
of the "Valterra" type, which means the fitting will have the two large "ears" which
connect to the two large lugs on the dump valve pipe. This fitting is normally attached
to one end of the sewer hose using a hose clamp. To store this fitting and the attached
hose in the Rialta hose storage compartment, simply push the end of the hose without
the fitting attached into the storage tube. The actual fitting will not enter the
storage tube but will remain on the outside where the storage strap will snap in
place to hold it securely. After repeated use you may find that one of the locking
tabs may start to break off. Don't worry, even Wal-Mart has replacements and the
cost is around $3.